
ในบทความนี้เราจะสร้างโฟลว์ที่ใช้ AI ทำงานต่างๆ ดังต่อไปนี้: ดูว่าเป็นภาษาอะไร, แปลเป็นภาษาอังกฤษ, สรุปข้อความจากรูปที่อัพโหลด, วิเคราะห์อารมณ์ความรู้สึก (sentiment analysis), แล้วบันทึกผลลัพธ์ใน Excel
Step-by-Step Guides
Create custom prompt
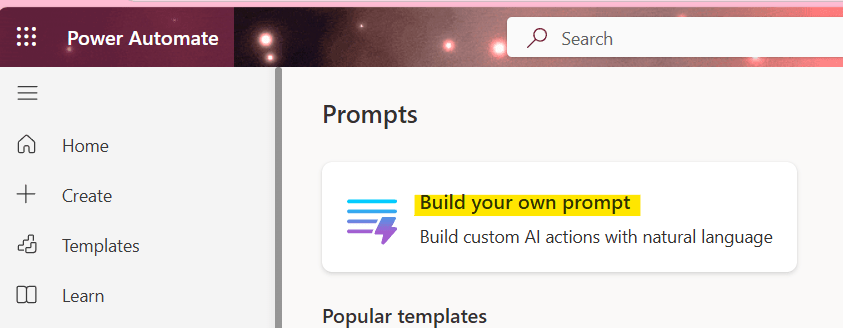
ไปที่ AI prompts ใน Power Automate แล้วคลิก ‘Build your own prompt’
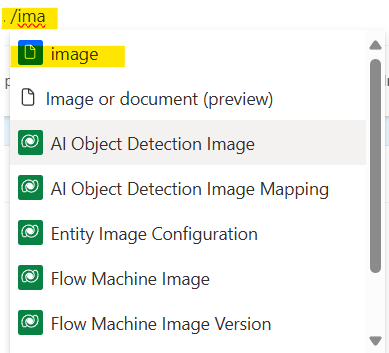
คลิก ‘Add’ แล้วเลือก ‘Image or document (preview)’ เนื่องจากเราจะใช้ trigger ‘When a file is created or modified (properties only)’ ดังนั้นต้องใช้ input เป็น image หรือ document

คลิก ‘Ok’

ตั้งชื่อ input variable เช่น “image” คลิกปุ่ม ‘Add input’ จากนั้นสร้าง prompt โดยใช้ข้อความและตัวแปร

ตัวอย่างการสร้าง prompt โดยใช้ข้อความและตัวแปร:
Extract the relevant data from the upload {image}ถ้าต้องการเพิ่มตัวแปรให้พิมพ์สัญลักษณ์ / ตามด้วยชื่อของตัวแปร แล้วคลิกเลือกที่ตัวแปรนั้น
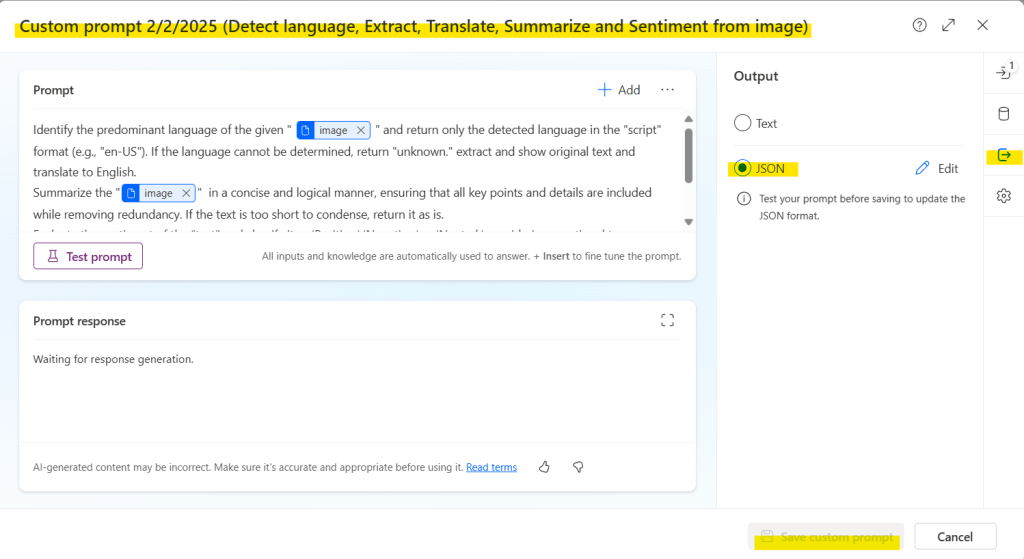
Prompt ของบทความนี้จะเป็นตามรูปภาพและ code block ด้านล่าง

 Identify the predominant language of the given {image} and return only the detected language in the "script" format (e.g., "en-US"). If the language cannot be determined, return "unknown." extract and show original text and translate to English.
Summarize the {image} in a concise and logical manner, ensuring that all key points and details are included while removing redundancy. If the text is too short to condense, return it as is.
Evaluate the sentiment of the "text" and classify it as 'Positive,' 'Negative,' or 'Neutral,' considering emotional tone, language cues, and context. If the sentiment is mixed, identify the most dominant emotion. The response must be one capitalized word with no additional explanation.
สามารถ Rename custom prompt ได้ตามต้องการ, เปลี่ยน output เป็น ‘JSON’ แล้วกด save custom prompt
Create SharePoint Library
สร้าง SharePoint Library ใน SharePoint site แล้วสร้างไฟล์ Excel

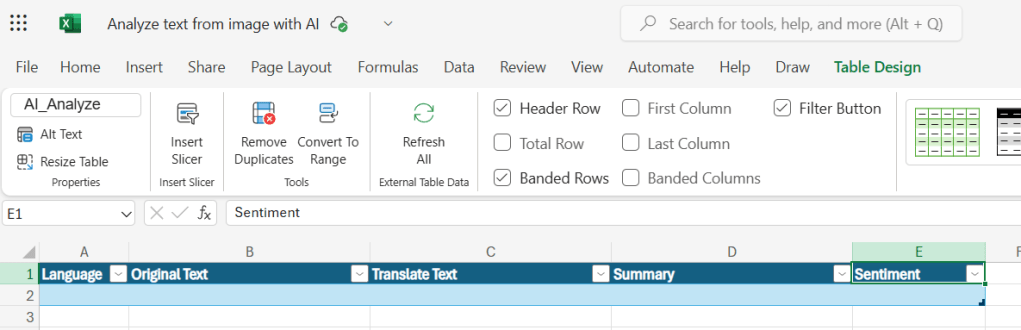
Prepare Excel Table
สร้างตารางที่มี column ต่อไปนี้: Language, Original Text, Translate Text, Summary, Sentiment
Create Cloud Flow
เลือก trigger ‘When a file is created (properties only)’
- เลือก ‘Site Address’ (Your SharePointSite)
- เลือก ‘Library Name’ (Your SharePoint Library)

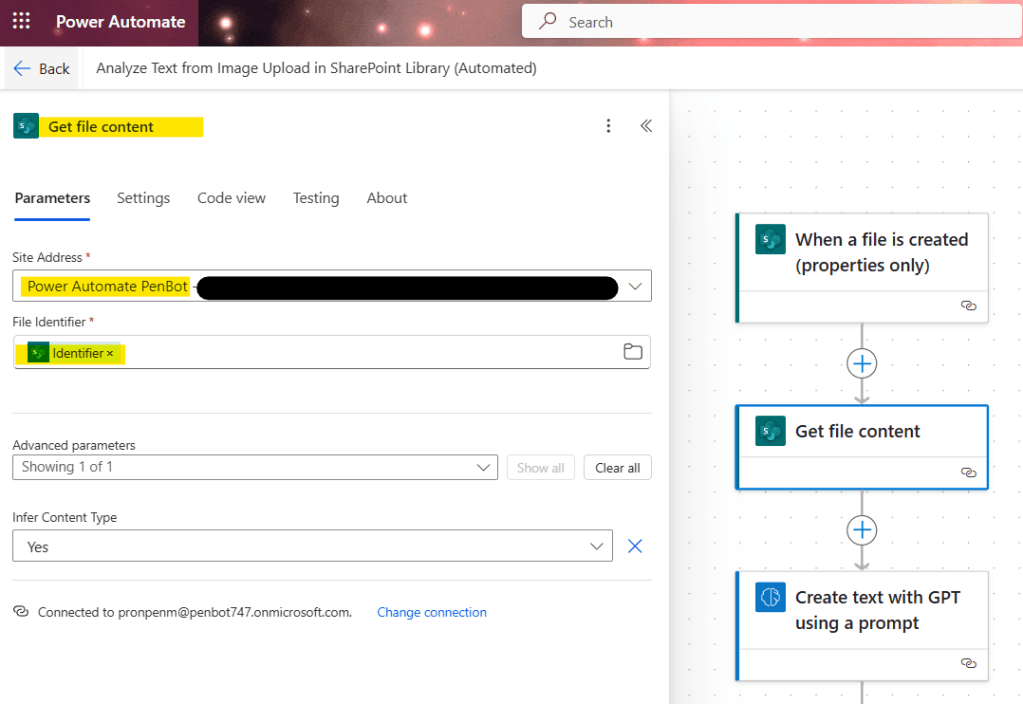
เลือก action ‘Get file content’
- เลือก ‘Site Address’ (Your SharePointSite)
- ใส่ ‘File Identifier’ (Dynamic content ‘Identifier’ from the previous trigger)
เลือก action ‘Create text with GPT using a prompt’
- เลือก ‘Prompt’ (Your custom prompt)
- ใส่ ‘Image’ (Dynamic content ‘File content’ from ‘Get file content’ action)

เลือก action ‘Add a row into a table’
- เลือก ‘Location’ ที่เก็บไฟล์ Excel
- เลือก ‘Document Library’ (Folder)
- เลือก ‘File’ (Excel File)
- เลือก ‘Table’ (Excel table)
- ใส่ ‘script’ ใน column ‘Language’
- ใส่ ‘original_text’ ใน column ‘Original Text’
- ใส่ ‘translated_text’ ใน column ‘Translate Text’
- ใส่ ‘summary’ ใน column ‘Summary’
- ใส่ ‘sentiment’ ใน column ‘Sentiment’

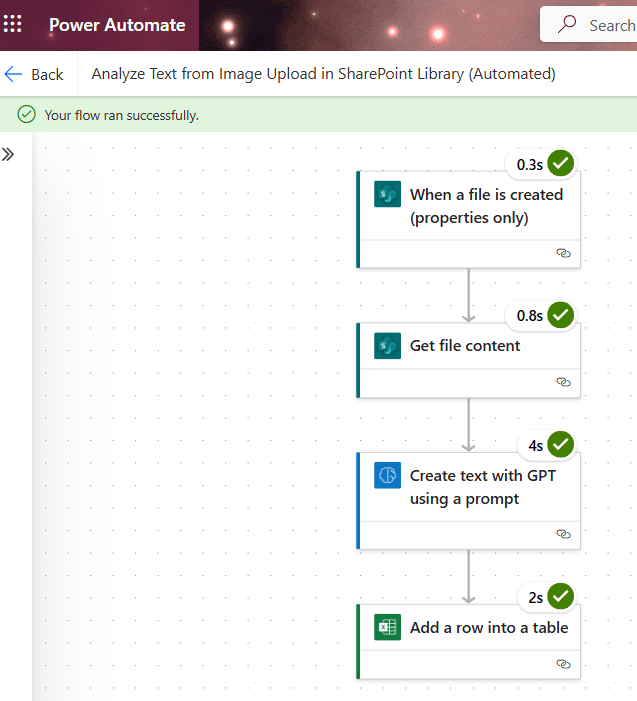
Test the flow
รันโฟลว์แล้ว upload ไฟล์ใน SharePoint Library


Credit image from https://wshippers.wordpress.com/2013/12/31/pics-trans-tvxqs-message-in-naver-music/

Leave a comment