
Power Automate Desktop is a low code/no code RPA (Robotic Process Automation) software use for automate various tasks through the User Interface on computers.
It can be downloaded and use for free.
Create a Desktop Flow
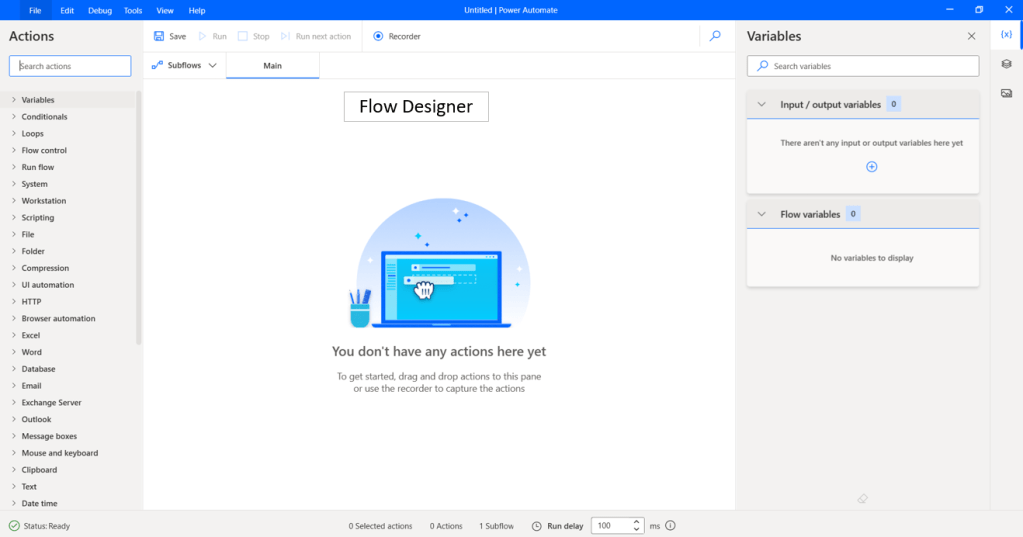
Open Power Automate Desktop and press New flow at the top left of Console.


Create Excel file and Data
Open Excel and enter the information as below and save the file to the Desktop.
Example of file path where Excel is saved:
C:\Users\User\Desktop\Excel Automation (Launch, Read, Close).xlsx
If you don’t want to type information yourself, you can download the file here.

Putting Actions in Workspace
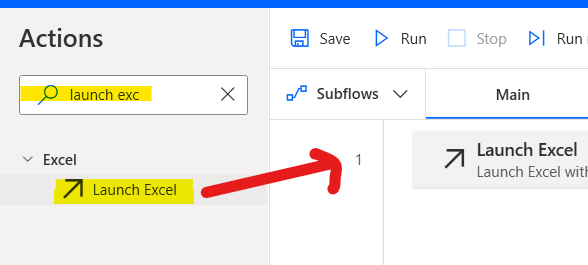
In the Action Pane on the left, find the action you want to trigger the robot to perform, such as “Launch Excel” and drag and drop it to the workspace of the flow designer or double-click on that action then the action will appear in the workspace automatically.

Launch Excel
There are 2 types of parameters of “Launch Excel”:
- with a blank document : opens a new Excel file.
- and open the following document : opens the Excel file on our computer.


In this article, select “and open the following document” and in the “Document path” parameter, enter the “file path of the Excel file“. Press Save.
At the Variables produced section of each action will show the variable that automatically create by Power Automate Desktop which is called “Flow variables“.
For the “Launch Excel” action, it will create the flow variable name as ExcelInstance automatically.

Note: You can rename the flow variable by click at the variable and type the new name. However, just keep in mind that you should name it easy to understand.
Read from Excel worksheet
The parameter of “ExcelInstance” will retrieve the data type of ExcelInstance in our flow, and put it in the dropdown, we can easily choose which Excel file to read the values from (in this case there will be only one value because we only have one Excel file open).
The parameter “Retrieve” can be adjusted in 5 ways:
- The value of single cell : read the value from only one Excel cell.
- Values from a range of cells : read values from multiple Excel cells. (It can be a single cell or multiple cells)
- Values from selection : read the value from the selected cell. (It can be a single cell or multiple cells)
- All available values from worksheet read values from the available Excel cells of the Excel worksheet.
- Values of named cells : read values from the Name Range that created in Excel.

For this article, Select “Values from a range of cells”.
In the Start column and End column, you can enter the letter that represent the order of the Excel column or enter the number of the Excel column.
- Start column, you can type A or 1
- End column, you can type D or 4
In the Start row and End row, you can enter the number of the Excel row.
- Start row, type 1
- End row type 11
Press save.
For the “Read from Excel worksheet” action, an ExcelData variable will be created automatically.
The data type of this variable will be Text value, Numeric value or Datatable, depending on the format we choose in “Retreive” and the values in Excel cell.

Write text to file
We will try to take the values that the robot can read and write them in notepad.
In the parameter “File Path”, select the location where you want to save the text file and name the file.
Example file path where Notepad is saved:
C:\Users\User\Desktop\StrawHatCrew.txt
In the parameter “Text to write” you can press {x} and select the ExcelData variable to insert.
In the parameter “If file exists” there are 2 types to choose from:
- Overwrite existing content : Overwrite existing content in the file.
- Append content : Write new line from the original file.
In this article, choose Overwrite existing content.

Close Excel
The parameter “Before Closing Excel” can be adjusted in 3 ways:
- Do not save document
- Save document
- Save document as : save as new Excel file (you will have to choose the extension and location you want to save)

In this article, choose “Do not save document”

Completed Flow
You will get a flow with 4 actions as shown in the picture below. Press Save and then press Run.

Result 1
You will get all the information in Excel from the column header and data with a comma symbol separating the columns.
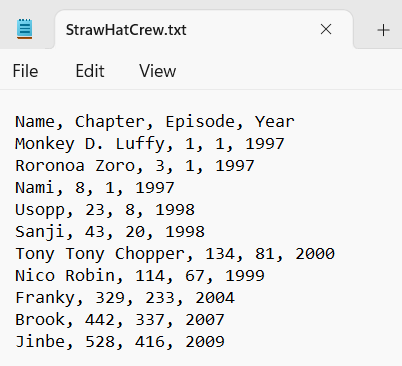
If you look at the Variable Pane on the right and double click on the ExcelData variable, you will see the data that we ordered the robot to read from Excel.

In this case, we don’t tell the robot that the data has a column header. The robot will name the columns for us as Column1, Column2, Column3, …

If we want to tell the robot that the data has a column header and want to use only the actual data, double click on the action “Read from Excel worksheet” and then go to Advanced, turn on the toggle “First line of range contains column names” and press Save

Press Save and Run again.

If the data in Excel increases/decreases, how do we tell the robot to read it?
Use the action to find the first free row and then subtract 1 to tell Excel’s range.

Get first free column/row from Excel worksheet
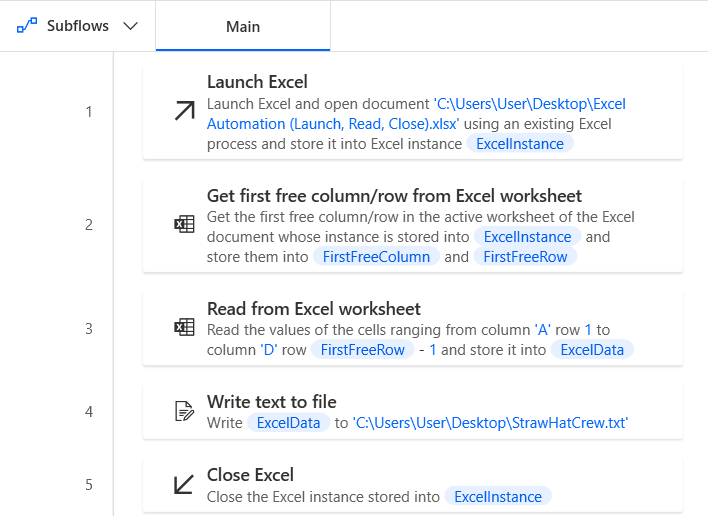
Drag the action “Get first free column/row from Excel worksheet” before “Read from Excel worksheet”.
You will get Variables produced as FirstFreeColumn and FirstFreeRow. Press Save.

Then double click on the action “Read from Excel worksheet” at the parameter “End row”, select the variable FirstFreeRow and write Expression minus 1.
From Excel above, FirstFreeRow has a value of 12. If we write it in Expression, the program calculates the value as 12 – 1 = 11.
When the data in the Excel file changes, increasing/decreasing It will find the value of the data more flexibly than entering numbers directly.

Edited Flow
Try adding data in Excel and then Run.

Result 2

Thank you for the mock data from One Piece Wiki.
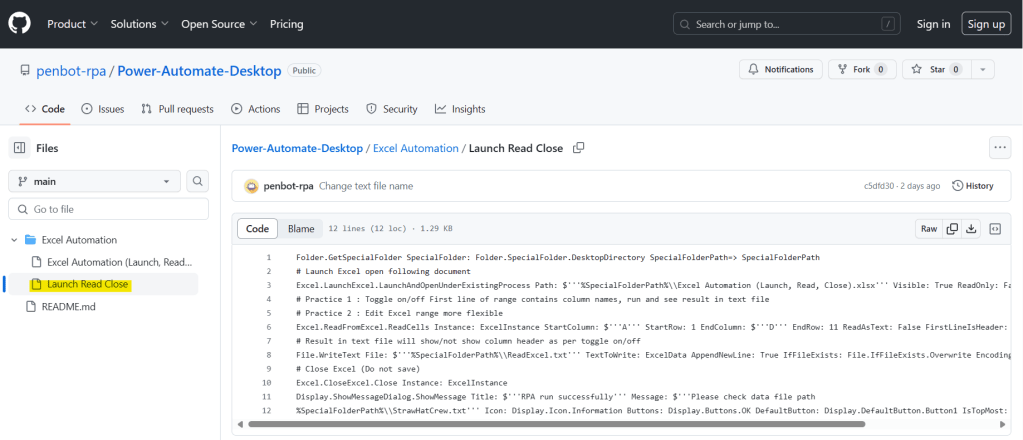
For anyone who wants to see the Power Automate Desktop code in this article, you can copy the code on github and paste it into the Workspace of Power Automate Desktop, but you’ll have to make some adjustments by yourself. (Try reading and reviewing this article again. You can definitely do it. ❤)
Hope this article will be useful to the people who just starting to study Power Automate Desktop, if you have any questions about this article, you can comment and ask section below.
Don’t forget to press like, share, subscribe for good articles from now on (press the subscribe button and you will receive a mail confirming your subscription to confirm again as well).
Until we meet again, Happy Automating!! 😁

Leave a comment